
| How I Solved (Most Of) the Yara CTF Puzzles: Puzzle #5 – #8 | 2015-08-19 17:00 |
Previously, I posted how I solved puzzles #1-#4 of the Yara CTF for Black Hat 2015, sponsored by phishme.com. In this post, I'll go into how I solved puzzles #5-#8.
As noted before, the puzzles are still accessible at the CTF page, so there are spoilers if you plan to go through them.
Puzzle #5
The fifth puzzle consisted of a zip archive named "cyber apt cloud attack simulation.zip" and a readme file. Within the archive were two files named "bad.exe" and "bad2.scr". The readme read:
Many times, attackers will use zip files in order to contain their malware to help
avoid detection. Create a rule that would look for this type of behaviour.
The solution to this was to create another Yara rule, so I took that to mean a Yara rule that would detect exe or scr files within a zip archive. In order to do that, I would need to look at the specification for the zip archive format. I used two places for references: Wikipedia, and the specification from PKWARE.
When creating the Yara rule, we first have to make sure we're dealing with a zip archive. According to the specification, zip files should begin with a local file header, or the structure that describes files in the archive. This structure begins with the little-endian hex number 0x04034b50. Note that when looking at that in a hex editor, you'd actually see it reversed.
Yara has a few commands that will allow you to obtain a string or
value from a specific offset within a file. Since the spec says the
signature will be at the first byte of the zip archive, we can write a
Yara condition to see if our signature is at byte 0. The
uint32(
uint32(0) == 0x04034b50
A zip archive will also have a local file structure for each file in the archive. The local file structure contains information such as the compressed and uncompressed file sizes, the compression method, and the file name. Since our goal is to find file names that contain ".exe" or ".scr", we'll need to parse through every local file header, find the file name (which starts at offset 30) and see if it contains .exe.
Yara allows us to do this by using the for .. in condition to iterate through strings found in a file. By iterating through all local file header values, we can jump to the file name offset and search it for the extensions we are looking for.
To do so, we first need to create a string of the local file header signature:
$local_file = { 50 4b 03 04 }
Then we instruct the Yara rule to loop through each instance of this value, or the start of each local file header, in the archive we are examining:
for any i in (1..#local_file):
 	( $ext_exe in (@local_file[i]+30..@local_file[i]+30+uint16(@local_file[i]+26)) or
	  $ext_scr in (@local_file[i]+30..@local_file[i]+30+uint16(@local_file[i]+26))
	)
Breaking this down, we are looping through each instance of the local file header with the for any i in (1..#local_file) statement.
Remember that the file name starts 30 bytes after the start of the header, which we can specify with @local_file[i]+30. (The @variable[i] format in Yara returns the location of the i-th instance of a string.)
The length of the filename is 26 bytes after the start of the header, which we can get with uint16(@local_file[i]+26). This statement takes the location 26 bytes after the start of the header, and converts it to an unsigned 16-bit integer.
Thus by using these two values, we know where the file name starts and stops. We can search this space for the ".exe" and ".scr" extensions using the in keyword and specifying the start and stop of the filename.
The final Yara rule became the following:
rule PM_Yara_CTF_2015_5
{
    meta:
        author = "thudak@korelogic.com"
        comment = "Solution 5"

    strings:
        $local_file = { 50 4b 03 04 }
        $ext_exe = ".exe" nocase
        $ext_scr = ".scr" nocase

    condition:
        // look for the ZIP header
        uint32(0) == 0x04034b50 and
        // make sure we have a local file header
        $local_file and
        // go through each local file header, find the filename,
        // and see if it has an extension we are looking for
        for any i in (1..#local_file):
        ( $ext_exe in (@local_file[i]+30..@local_file[i]+30+uint16(@local_file[i]+26)) or
          $ext_scr in (@local_file[i]+30..@local_file[i]+30+uint16(@local_file[i]+26))
        )
}
Puzzle #6
This puzzle was evil.
Contained within this puzzle was a jpeg of Austin Powers and a readme.txt file that stated "Good luck!" The solution to this puzzle was a Yara rule, and the answers to the questions "How's it encoded?" and "What's the filename inside?" To me, this meant that there was a file hidden inside the image. In other words, steganography!
Admittedly, this puzzle took me a while because I kept going in the wrong direction. I had convinced myself that a stego program had been used to hide a file inside the image. When steganography is suspected, there are a few tools that can be used to detect the steganography program that had been used. Unfortunately, these all came back with no results. This meant I was either going in the wrong direction or I had to find a different stego program that had been used. I started with the latter method, searching the Internet for any stego program I could and trying it out on the image. Once again, no results.
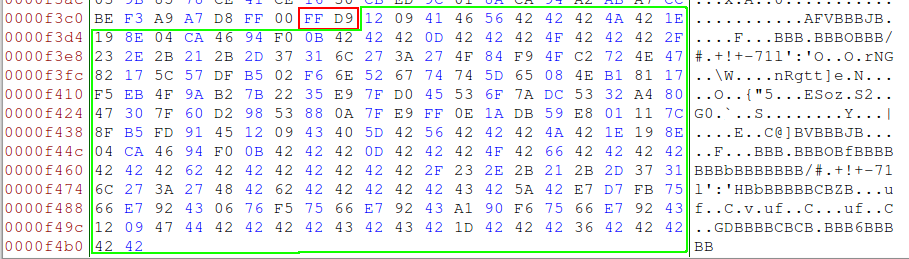
After too long, I decided to try a different approach and read over the JPEG file format. It turns out that JPEG images, like some other file formats, have a specific marker to indicate the end of the file. For JPEGs, this is the value 0xFF 0xD9. A quick examination of a dozen or so JPEGs on my local system showed this was the case - all ended in 0xFF 0xD9. Interestingly, the JPEG in the puzzle did not.
I pulled up the JPEG in a hex editor and found 233 bytes present after the end of file marker, marked in green in the image below. While this could have been bytes thrown there by the image creation software, it was worth pursuing.
There is a technique for copying files to the end of an image using the copy command in Windows. Using the command below, you can combine two files together (original.jpg and hidden.zip) and place them in a new file (newimage.jpg). This is an effective, and simple, way to hide one file at the end of another.
copy /b original.jpg + hidden.zip newimage.jpg
I extracted the extra bytes from the jpeg and examined them. From the answer template I knew it was encoded in some fashion, so I needed to figure out what encoding was used. In the last post, I mentioned that when you do puzzles like this there should always be a few things you look out for. The first is base64 encoding, which we could tell this was not due to the presence of non-ASCII characters. The second, is XOR encoding.
XOR (exclusive or) is a mathematical operation that is commonly used to hide data. While we don't need to get into the details of XOR, there are a couple properties of XOR that you should remember.
- A XOR K = C and C XOR A = K. That is, if you XOR a value (A) with a key (K) to get ciphertext (C), you can get the key (K) by XOR'ing the ciphertext (C) with the original value (A).
- Anything XOR'd by zero (0) is itself.
These two properties can be used to determine the XOR key that was used to encode data, assuming XOR was used. If we can guess what some of the values of the file may be, such as a file signature, we can apply those values to the file and see if we get something that looks like a key. For example, if we thought this was a PE executable, we could XOR the first two bytes by MZ, which is the signature of a PE executable, and see if we found a repeating pattern. This is usually a hit or miss operation and can be time consuming. Fortunately, there is an easier way.
Anything XOR'd by 0 is itself. So, if there were locations in a file containing only 0s and an XOR key was applied to it, then the key itself would be revealed. Guess what? Most binary files have places in them that contain only zeroes. We only need to look through the encoded data for any patterns and try those patterns as our key.
Looking at the encoded data, you'll notice there are some large areas of the letter B (0x42). This could be our XOR key. Using a hex editor, I applied the value 0x42 to the entire file to see what happened:
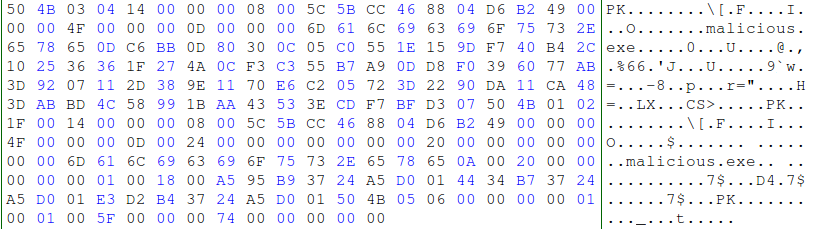
The result should look familiar - a Zip archive! In the image above, we can see that not only did it decode, but the filename inside is malicious.exe! This answered our first two questions - how the file was encoded and what the file name was. Now onto the Yara rule.
The contest didn't specify what the Yara rule should be, so I decided to create one that detected JPEGs that had extra data at the end. This is shown below.
rule PM_Yara_CTF_2015_6
{
	meta:
		author = "thudak@korelogic.com"
		comment = "Solution 6 - finds data after the jpeg final marker"

	strings:
		$header = { ff d8 ?? ?? ?? ?? 4A 46 49 46}

	condition:
		// JPEGs should always end with 0xffd9 - if not, there is something else there
		$header at 0 and uint16(filesize-2) != 0xd9ff

}
The rule first looks for the JPEG header, to ensure we are looking at a JPEG image. JPEG headers start with the value 0xFF 0xD8, followed by the JFIF APP0 marker segment. The first 4 bytes of this segment contain an APP0 marker and the length of the segment. From looking at multiple files, these weren't always the same values (even though I suspect they should be). After those bytes are the characters "JFIF", or 0x4A 0x46 0x49 0x46 in hex. This is how the $header string for the rule was created.
Next the rule looks to see if the last two bytes of the file are the end of file marker, 0xFF 0xD9. Yara contains a keyword filesize which will contain the size of the file it is looking at. Since the last two bytes of the file are supposed to contain the end of file marker, we can extract those bytes using uint16(filesize-2), and see if they are the end of file marker. If they aren't, we've found extra data at the end of our image.
Note that in the Yara rule, we are examining for 0xd9ff - a reversal of the end of file marker. This is because uint16() extracts the little-endian format of those bytes, so the values would be reversed. I could have used the Yara command uint16be() and extracted them in the order I would expect them in.
Puzzle #7
The next puzzle consisted of two more zip files, named encrypted_zip.zip and not_encrypted.zip, and a readme that instructed us to create a Yara rule that would detect the encrypted zip file, but not the unencrypted one.
Luckily, I had a slight advantage on this one. In my work on MASTIFF, I had created a plug-in that would analyze the structure of a zip archive, so I already knew how files were marked as encrypted or not.
Six bytes into the local file header, the structure kept for each file, is a field called the general purpose bit flag. This field will set specific bits to describe various options for the file within the archive. There is one bit in that field we need to examine: bit 0. If set, this bit signifies the file is encrypted.
By creating a Yara rule that looks at this field for each local file header, we can perform a boolean AND operation to see if the bit is set. If it is, then the file is encrypted. The resulting Yara rule is shown below:
rule PM_Yara_CTF_2015_7
{
    meta:
        author = "thudak@korelogic.com"
        comment = "Solution 7 - encrypted zip file"

    strings:
        $local_file = { 50 4b 03 04 }

    condition:
        // look for the ZIP header
        uint32(0) == 0x04034b50 and
        // make sure we have a local file header
        $local_file and
        // go through each local file header and see if the encrypt bits are set
        for any i in (1..#local_file): (uint16(@local_file[i]+6) & 0x1 == 0x1)
}
Look familiar? It should, because I essentially copied the Yara rule from puzzle #5 and modified it slightly.
In this rule, we are checking to ensure we are dealing with a zip archive, and then going through each local file header and examining the general purpose bit field that is 6 bytes from the start of the header. The bit field is AND'd with 0x1 and checked to see if the result is 0x1. If it is, we know the encrypted bit was set and our rule should fire.
A small side note
Confession time. The Zip Yara rules for puzzles 5 and 7 are not the same ones I turned in. As I was writing this up, I realized that my rules were only looking at both the central file directory header in the zip files, as well as the local file header. This isn't a problem, except that the offsets for the file names, lengths, and general bit field are different in the central structure and local file headers.
For puzzle #5, this wasn't an issue as I was using the offsets for the local file headers as I should have been; it was just doing a little extra work when it found the central directory file header. For puzzle #7, it was only looking at the general bit field for the central directory file header, which is at offset 8. While the rule would still work as the encryption bit would be set in the central directory file header, it could also create a number of false positives and was thus corrected above. Sorry.
Puzzle #8
The final puzzle in this post was a tricky one, as I went down a path that in the end wasn't needed. This puzzle contained a minidump crash report named some_file.dmp, and the instructions to create a Yara rule and answer the questions "What's the malware?" and "What's the configuration data?".
As I was unfamiliar with minidump files, I had to do some initial research. Minidump files contain information about a system and its processes at the time the minidump was created, typically when a process or system has crashed. In other words, they will contain portions of the memory from the system. By analyzing the minidump, we have a view into the compromised system to hopefully determine what the issue was. The way I choose to analyze the file was to use WinDbg.
After loading the minidump file into WinDbg, I ran a number of commands, such as "!analyze -v", that told me this was a crash dump of explorer.exe. For my purposes, this meant we were dealing with malware that either had renamed itself as explorer.exe or injected itself into explorer.exe. Additional commands did not show me anything unusual, such as oddly named DLLs. Admittedly, my WinDbg skills are not at a premium as I prefer other debuggers, so I may have not been running some commands that would have given me more clues.
However, on a hunch I ran a string search for the string "serverlist". Often in these types of contests, you'll get a gut feeling on what to search for. You have to follow your gut and see if you are right - if you are it can pay off tremendously. In this case I got lucky and my search paid off.

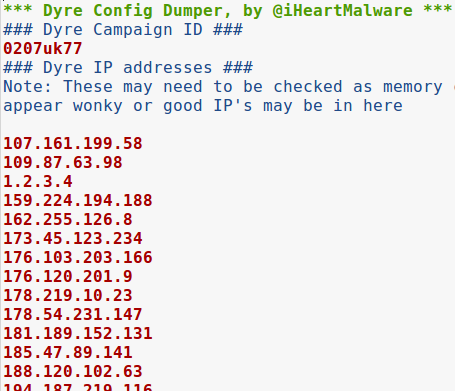
From the puzzle questions, I knew I was looking for malware that had a configuration file. From the minidump analysis, I had explorer.exe. The only malware I could quickly think of that utilized both was Dyre, a popular banking malware that injects itself into explorer.exe and has a configuration file. The string "serverlist" is one of Dyre's configuration file commands.
Upon finding the string "serverlist", I knew we were dealing with Dyre and just had to pull out its configuration file. After a few searches and mis-steps, one of which involved trying to get Volatility to read minidump files, I found a Python script by phishme.com to extract the Dyre configuration file from memory crash dumps! This script successfully extracted the configuration file from the crash dump.
For the Yara rule, I decided to focus on the Dyre configuration file since it has a number of static configuration options that can be easily detected. The resulting rule is below.
rule PM_Yara_CTF_2015_8
{
    meta:
        author = "thudak@korelogic.com"
        comment = "Solution 8 - look for dyre config"

    strings:
        $ = "<serverlist>"
        $ = "<server>"
        $ = "</server>"
        $ = "</serverlist>"
        $ = "<rpci>"
        $ = "</rpci>"
        $ = "<litem>"
        $ = "</litem>"

    condition:
        all of them
}
More to come!
In my opinion, puzzles 5 through 8 were the most challenging of the CTF. They did what good CTF puzzles should do - they make you think and work down paths that many will not normally go down (at least until they've experienced it). Most importantly, they used techniques that analysts and responders are likely to find in their daily work.
Next up, the last three puzzles!
| Posted by Tyler at: 17:00 permalink |